Recently, I wrote about parsing JSON and again revisited some updated syntax for JSON parsing in Swift 1.2. I received an email from learnSwift reader Shameer asking for a practical example of using JSON in an iOS app, so this post will focus on the most practical of all iOS examples: UITableView.
I've implemented UITableViews in nearly every app I've ever written, including countless class demos. It's the perfect topic for illustrating some of the most common, and often misunderstood, design patterns in Cocoa; such as Delegation, Model-View-Controller and Target-Action. It's also a great test-bed for learning about more advanced topics such as lazy-loading, memory management & multi-threaded programming.
UITableView is a cornerstone of UIKit; allowing you to easily display a scrollable, tap-able list of dynamically generated items with buttery smooth performance. If you're not familiar with UITableView, open the Settings app on your phone (or just about any other app that displays data) and you'll see examples of UITableView. Unlike it's sexier, more custommizable counterpart, UICollectionView, UITableView has been with us on iOS since the very first iPhone, and very little of the API for UITableView has changed since then, but that's a good thing.
Creating a UITableView is quite simple, just create it using one of the available initializers, and add it to your view heirarchy:
let tableView = UITableView(frame: self.view.frame, style: .Grouped)
self.view.addSubview(tableView)
More likely than not, however, if you're not a tableView expert, you might prefer to create the tableView through interface builder. Just drag a UITableView object onto your storyboard like so:

Drag a Table View from the object browser onto your ViewController in your Storyboard
With the easy part out of the way, now we must discuss how a UITableView actually works. You could pre-populate your table with static data, which is helpful for things like Settings / Preferences, but more often than not, you're creating a table to display data that doesn't exist yet (i.e. data you'll download from the web at runtime). To populate a tableView with dynamic data, however, the tableView needs three things:
- Table Cell prototype(s) for each type of cell the table will display
- How many cells/rows to draw
- How to configure a cell prototype for a given row
Table Cell Prototypes
Table cell prototypes allow you to design a TableViewCell in Interface Builder (or programmatically) which will be re-used for each row in your tableView. TableViews utilizing dynamic data must have at least one dynamic prototype, but can have multiple prototype cells if necessary. Typically you will create one dynamic prototype for each distinct type of cell your table will display (e.g. a simple text-only prototype cell, and a second prototype cell with text and a large photo).
The most straight-forward way to create dynamic prototype cells is through interface builder.
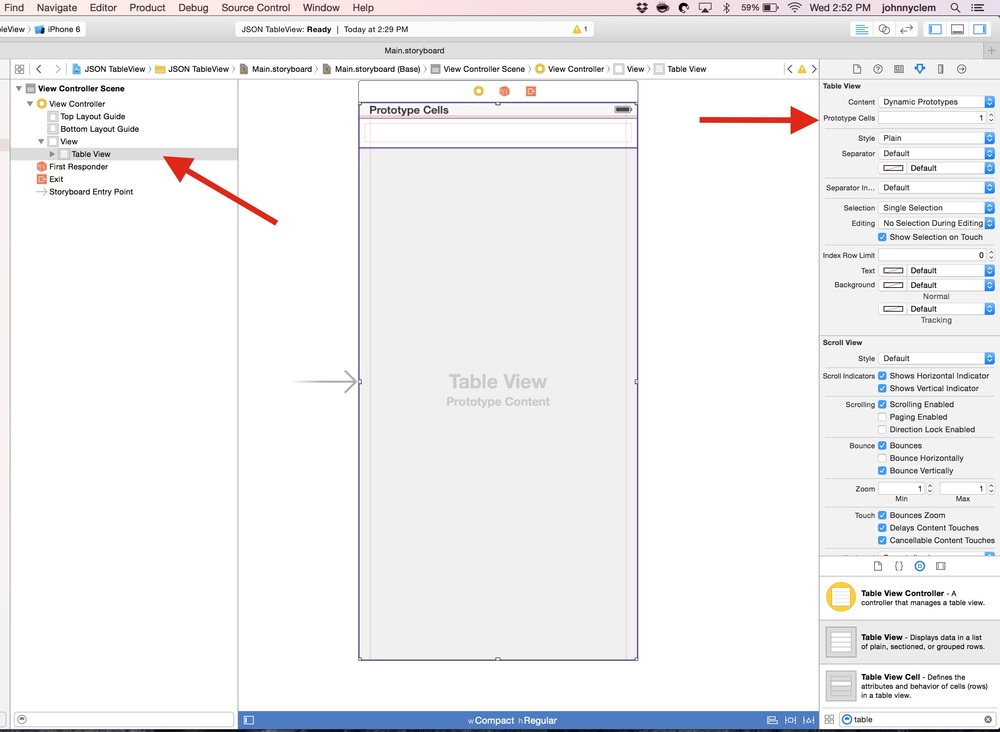
Click on your tableView to select it, then go to the Properties Inspector (the one that looks like a belt buckle) and change Dynamic Prototypes from the default 0 to 1
Since TableViews can support multiple dynamic prototypes, each prototype cell needs its own unique identifier. The identifier is a case-sensitive string value, similar to a segue identifier. For this example, I'm using "Cell" as the identifier.

To set the identifier for a dynamic prototype cell, click on the cell from your view hierarchy, then select the Attributes Inspector and enter a unique string in the Identifier field.
How Many Rows -- tableView:numberOfRowsInSection:
The next step is letting our tableView know how many cells to create. Since our data is dynamic, this is done at runtime and typically corresponds to the count of an array of objects in our viewController. Before we can implement the necessary method, we need to set our ViewController as the dataSource for the tableView.

Select your tableView, then open the Connections Inspector (the arrow with the circle around it). The first outlet listed is called dataSource; click and drag from the circle next to dataSource all the way to your yellow ViewController object to establish the link.
Now that the interface is setup, the tableView will ask its dataSource for numberOfRowsInSection and for each row, it will then ask the dataSource for a cell using the tableView:cellForRowAtIndexPath: method. We've told the tableView that ViewController will be its dataSource. The dataSource for a tableView is any object that conforms to the UITableViewDataSource Protocol.
If you're not familiar with Protocols, think of it as a contract between two objects in your code. The ViewController is going to conform to the dataSource protocol, this means that the ViewController "promises" to respond to the required methods in the protocol (numberOfRows... and cellForRow...) and may or may not respond to the optional methods in the protocol. To "opt-in" to the UITableViewDataSource protocol, simply add it to your class declaration like so:
class ViewController: UIViewController, UITableViewDataSource
If you build and run the app at this point, it will crash immediately, informing you that ViewController does not respond to the selector tableView:numberOfRowsInSection: All this means is that the tableView loaded, looked for its dataSource, found it (ViewController) then called the dataSource method(s) on it. Let's fix this crash by fullfilling ViewController's end of the contract and implementing the required methods.
First, tableView:numberOfRowsInSection:
var repositories = [String]()
func tableView(tableView: UITableView, numberOfRowsInSection section: Int) -> Int {
    return repositories.count
}
The first line simply creates an array to hold our repositories. Later on, we'll be downloading them as JSON from the GitHub API and de-serializing them into their own model objects, but for now, we'll just use an array of strings to keep things simple.
Next, we implement the tableView:numberOfRowsInSection: method by returning an Int. Since we don't know how many rows we'll actually need until runtime, we return repositories.count, meaning we always want the number of rows in the table to match the number of repositories in our array (it feels like cheating, I know, but it's just that simple).
Next, the other required method in the dataSource protocol: tableView:cellForRowAtIndexPath:
func tableView(tableView: UITableView, cellForRowAtIndexPath indexPath: NSIndexPath) -> UITableViewCell {
    var cell = tableView.dequeueReusableCellWithIdentifier("Cell", forIndexPath: indexPath) as! UITableViewCell
    cell.textLabel?.text = repositories[indexPath.row]
    return cell
}
Three lines is about as short as this method can be. I've seen implementations of this method that span multiple pages, but keep in mine, this method will run once for each cell, everytime it needs to be drawn on screen.
Looking at the code for this method, the first line asks the tableView for a reusable cell for the given identifier. Next, we assign a string to the textLabel?.text. Note that textLabel is optional, this is because not all UITableViewCells have a textLabel, so using optional assignment lets us assign the string, but only if the label exists. Finally, we return the cell to the caller (which in this case will be the tableView).
At this point, your ViewController class should look something like this:
import UIKit
class ViewController: UIViewController, UITableViewDataSource {
    var repositories = [String]()
    func tableView(tableView: UITableView, numberOfRowsInSection section: Int) -> Int {
        return repositories.count
    }
    func tableView(tableView: UITableView, cellForRowAtIndexPath indexPath: NSIndexPath) -> UITableViewCell {
        var cell = tableView.dequeueReusableCellWithIdentifier("Cell", forIndexPath: indexPath) as! UITableViewCell
        cell.textLabel?.text = repositories[indexPath.row]
        return cell
    }
}
This leads to perhaps the most interesting discussion around UITableView: What the hell does dequeueReusableCellWithIdentifier mean? Remember what I said about UITableView being highly optimized for performance, and how it's been around since the very first versions of iOS? This notion of dequeueing reusable cells is what gives UITableView its unfair advantage when it comes to performance.
Suppose you fetch some data from the web and then display it in your tableView. If your network request comes back with 3 or 4 results, you could create tableView cells for each result without any issues. But let's suppose your network request comes back with 10,000 results. As you scroll your tableView, your app's memory footprint would start to grow. Before long, the interface would start to lag, and long before you scrolled to the bottom of your tableView, the app would slow to a crawl, or crash. Queueing and de-queueing cells tackles this problem in a rather elegant way; taking advantage of the fact that it is much more performant and much less resource intensive to swap out the data of a tableView cell and reuse it, than to create each cell from scratch.
You'll also recall that we gave our dynamic prototype cell a Reuse Identifier. Here's what happens when you ask a tableView to dequeue a reusable cell for a given identifier:
- The tableView searches for a prototype cell with a matching identifier (if a prototype isn't found for the identifier, it's an instant crash)
- If the tableView doesn't have a cell for the given identifier available for re-use, it creates a new cell from the prototype
- If the tableView does have a cell for the given identifier in its re-use pool (more on this in a moment) the cell is "de-queued" or pulled out of the re-use pool and returned to the called (ViewController in our case)
The tableView's re-use pool is an array of tableView cells that have already been constructed. Meaning, we've already paid the computational cost for creating the UI elements for the cell, but the cell is no longer in use. The question you may be asking yourself at this point is, "How does a cell end up in the reuse pool?" This happens when the cell is pushed off-screen.
For example:
- you have 10 items in your tableView
- only 5 can fit on-screen at once
- when the table first loads, cells 0-4 are created from the prototype
- when the table scrolls, the re-use pool is empty, so cell #5 is created from the prototype, while cell #0 scrolls off-screen and is added to the re-use pool
- when cell #6 is ready to scroll on-screen, the tableView has a cell available for re-use, so it de-queues cell #0 for re-use, while enqueuing cell #1 for re-use and so-on
Ok, enough nitty-gritty UITableView shop talk, let's move on to deserializing JSON into model objects and turning out String-backed-table into a Model-backed-table.
First thing we'll need is a new Swift file to contain our Repository model class. We could actually declare it as a nested class in ViewController.swift, but it's cleaner and more maintainable (IMHO) to give it a separate file.
To create a new Swift file, choose File -> New -> File and choose Swift File as the file type (not Cocoa Touch Class). Name the file Repository and click Create. According to the Github API docs, there are dozens of potential properties a Repository could have, but we only need to write in the properties we actually care about. For this tutorial, name, description and html_url should be all we need.
Edit Repository.swift to look like this:
import UIKit
class Repository {
    var name: String?
    var description: String?
    var html_url: String?
    init(json: NSDictionary) {
        self.name = json["name"] as? String
        self.description = json["description"] as? String
        self.html_url = json["html_url"] as? String
    }
}
Nothing out of the ordinary going on here. We declare the three properties that the class needs as vars of the String type. The only other thing going on in this model class is a designated initializer which will take an NSDictionary, extract the relevant values and assign them to its properties.
With our Model class complete, let's head back over to ViewController.swift and update it to use Repositories instead of Strings. Update ViewController.swift like so:
import UIKit
class ViewController: UIViewController, UITableViewDataSource {
    var repositories = [Repository]()
    func tableView(tableView: UITableView, numberOfRowsInSection section: Int) -> Int {
        return repositories.count
    }
    func tableView(tableView: UITableView, cellForRowAtIndexPath indexPath: NSIndexPath) -> UITableViewCell {
        var cell = tableView.dequeueReusableCellWithIdentifier("Cell", forIndexPath: indexPath) as! UITableViewCell
        cell.textLabel?.text = repositories[indexPath.row].name
        cell.detailTextLabel?.text = repositories[indexPath.row].description
        return cell
    }
}
Only a few changes were necessary; we change the type of the repositories array from [String] to [Repository], then just update tableView:cellForRowAtIndexPath: to use the .name property of the array item, rather than the item itself. I've also added an additional line here to set the repository description as the detailText.
Last, but not least, we write the code to make the network call, construct the repository objects, and reload the table. The logical place to put this for our demo app is when the view first loads, so add an override method for viewDidLoad like this:
override func viewDidLoad() {
    super.viewDidLoad()
    // 1
    let reposURL = NSURL(string: "https://api.github.com/search/repositories?q=learn+swift+language:swift&sort=stars&order=desc")
    // 2
    if let JSONData = NSData(contentsOfURL: reposURL!) {
        // 3
        if let json = NSJSONSerialization.JSONObjectWithData(JSONData, options: nil, error: nil) as? NSDictionary {
            // 4
            if let reposArray = json["items"] as? [NSDictionary] {
                // 5
                for item in reposArray {
                    repositories.append(Repository(json: item))
                }
            }
        }
    }
}
Build and run, and you should see a fully populated tableView full of Github repos from the search string "learn swift." Let's take this method line-by-line to get a sense for what's going on.
First, we make the call to super.viewDidLoad() to call the superclass implementation (note: if you forget to call super.viewDidLoad(), bad/unexpected things can happen). We then create an NSURL object with a search string endpoint for the Github API. Feel free to paste that URL into your browser to see the raw response your app will be deserializing.
Next, we optionally unwrap an NSData object with the contents of the URL. This could fail for a variety of reasons (API rate limiting, no network connection, etc.) so an if/let is appropriate.
Now comes the magic; we optionally unwrap the NSData into an NSDictionary using the NSJSONSerialization class.
Now that we have an NSDictionary representation of the JSON response, we can look at the raw response in the browser to see that the actual repository data is nested under the "items" key, so we optionally unwrap the items into an Array of NSDictionaries
Lastly, we iterate over the array of items, constructing a new Repository object for each one, and adding it to the repositories array.
Hopefully this post gives you a thorough understanding of how to populate a UITableView from JSON data. This post may be more than you (or anyone else for that matter) ever cared to know about UITableView, but trust me, we've only hit the tip of the iceberg for one of the most commonly used and most heavily customized components in all of UIKit.
Next Steps:
If you followed along in Xcode, you'll notice that we have an html_url property on our model class that was never used. Try adding a segue to a UIWebView and load the web page for the repo. Beyond that, add a search bar to the table, and you pretty much have a full featured Github app.
If you didn't follow along, be sure to grab the code for the completed example project on Github here. Also included in the repo is a simple Playground showing a minimal UITableView dataSource implementation.
Either way, if you like this post, found it useful, or have a better / alternative way of doing it, please leave a comment below, and thanks for making it to the end of a rather long, and hopefully informative post.
